Building my personal site: A behind-the-scenes look
Before reading further, you might want to check out my personal site’s source code, linked here: https://github.com/jeffreyrampineda/jeffreypineda.dev
The tools I decided to use
Here is a rundown of the technologies I chose for building my personal site:
- Package Manager: NPM
- Framework: Astro
- Styling: Tailwind CSS
- Deployment: Netlify
It all came together because of how solid these tools are.
Next.js vs Astro
Originally I used Next.js but I realized it’s more optimized for apps that need dynamic rendering, routing, and interactivity—which might be overkill for a simple portfolio site. Here are my top 3 reasons for using Astro instead of Next.js:
-
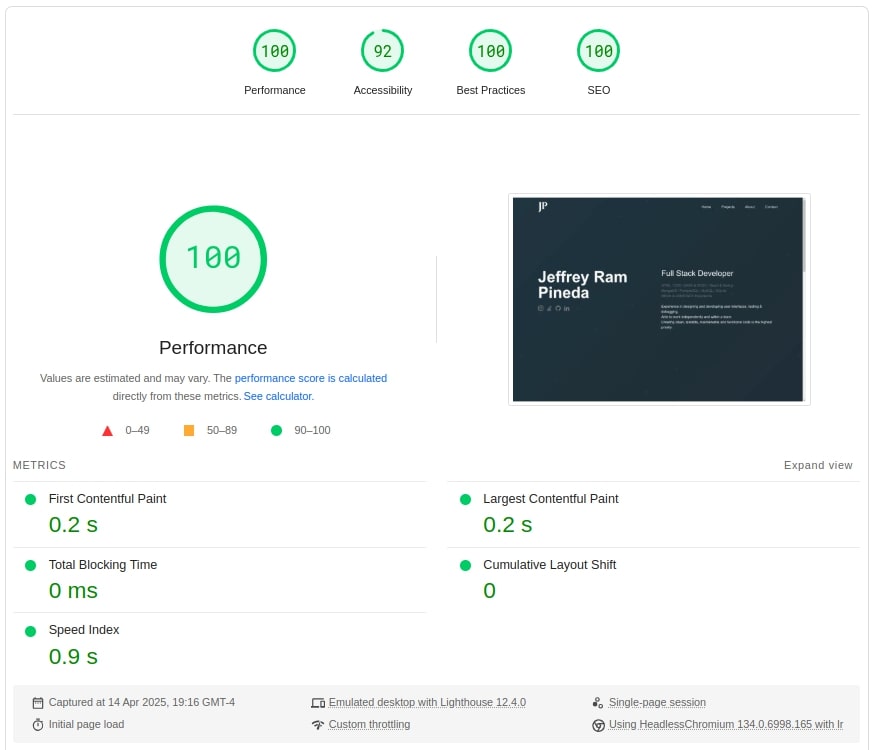
🚀 Blazing Fast Performance (Zero JS by Default): Astro ships zero JavaScript unless you need it, making pages load ultra-fast—perfect for impressing visitors and boosting SEO.
-
🧱 Built for Static Sites: Astro is optimized for static content like portfolios, blogs, and documentation—no complex config needed. It’s simple, efficient, and just works.
-
🧩 Framework Flexibility: You can mix and match components from React, Svelte, Vue, etc., in the same Astro project—great if you want to showcase different front-end skills which I definitely plan to do in the future.
Why I Chose Astro
Astro became the backbone of my site because it’s designed specifically for building content-focused websites — think blogs, portfolios, marketing sites, or even e-commerce — which made it a perfect fit for my personal site.
Here’s what stood out to me:
-
Island Architecture: Astro renders static HTML by default and only hydrates JavaScript where it’s actually needed. That means faster load times and better performance.
-
Framework Flexibility: It plays nicely with multiple frameworks — React, Vue, Svelte, etc. — but you don’t have to use any if you prefer keeping it simple.
-
Markdown & MDX Support: Writing posts (including this one) in Markdown feels natural, and with MDX, I can drop in components wherever I want.
-
Built-in Image Optimization: Astro handles image compression and resizing for me, which is one less thing to worry about during builds.
Styling with Tailwind CSS
When styling my site, I wanted something that let me move fast without getting bogged down in writing endless lines of custom CSS. Tailwind CSS turned out to be the perfect tool for the job. Its utility-first approach gave me complete control over the design, right in my HTML, and made it easy to build a clean, responsive layout without leaving my pages/components.
Tailwind CSS made styling feel smooth and efficient. Here’s why I loved using it:
-
Utility-First Approach: No more switching between HTML and CSS files — I can apply styles inline and build up the design naturally.
-
Rapid Prototyping: Iterating on designs is fast. I could tweak paddings, margins, or colors instantly without leaving my HTML.
-
Responsive Design Made Easy: Tailwind’s mobile-first breakpoints let me build responsive layouts without writing custom media queries.
-
Customization: I can set up my own color palette and typography system in tailwind.config.js, which helped maintain a consistent look across the site.
Hosting with Netlify
Netlify made deploying my site effortless which took me less than 3 minutes. I connected my GitHub repo, and every time I push to the main branch, Netlify automatically rebuilds and updates the site within minutes — no manual steps required. Best of all, it’s completely free for personal projects like mine, with a generous free tier that covers everything I need. Netlify also includes useful extras like built-in analytics and performance insights, which help me monitor how the site is running without needing third-party tools.
Wrapping It All Up
Building my personal site was a fun and rewarding experience, and choosing the right tools made all the difference. Astro gave me a fast, modern foundation built for content-focused sites, Tailwind CSS let me design with speed and precision, and Netlify handled deployment like magic — all without costing a dime.
This stack not only helped me bring my vision to life quickly, but also made the process enjoyable from start to finish. If you’re thinking about launching your own site, I’d definitely recommend giving this setup a try. For those interested, Astro has a beginner-friendly tutorial on how to make a blog site: https://docs.astro.build/en/tutorial/0-introduction/
Thank you so much for reading!